|
|
||
|---|---|---|
| .github | ||
| auto_cpufreq | ||
| bin | ||
| scripts | ||
| snap | ||
| .gitignore | ||
| LICENSE | ||
| README.md | ||
| auto-cpufreq-installer | ||
| auto-cpufreq.conf-example | ||
| requirements.txt | ||
| setup.py | ||
README.md
auto-cpufreq
Automatic CPU speed & power optimizer for Linux based on active monitoring of laptop's battery state, CPU usage, CPU temperature and system load. Ultimately allowing you to improve battery life without making any compromises.
For tl;dr folks there's a: Youtube: auto-cpufreq - tool demo
Why do I need auto-cpufreq?
One of the problems with Linux today on laptops is that CPU will run in unoptimized manner which will negatively reflect on battery life. For example, CPU will run using "performance" governor with turbo boost enabled regardless if it's plugged in to power or not.
Issue can be mitigated by using tools like indicator-cpufreq or cpufreq, but these still require manual action from your side which can be daunting and cumbersome.
Using tools like TLP can help in this situation with extending battery life (which is something I used to do for numerous years), but it also might come with its own set of problems, like losing turbo boost.
With that said, I needed a simple tool which would automatically make "cpufreq" related changes, save battery like TLP, but let Linux kernel do most of the heavy lifting. That's how auto-cpufreq was born.
Please note: auto-cpufreq aims to replace TLP in terms of functionality and after you install auto-cpufreq it's recommended to remove TLP. If both are used for same functionality, i.e: to set CPU frequencies it'll lead to unwanted results like overheating. Hence, only use both tools in tandem if you know what you're doing.
Tool/daemon that does not conflict with auto-cpufreq in any way and is even recommended to have running alongside is thermald.
Supported architectures and devices
Supported devices must have an Intel, AMD or ARM CPUs. This tool was developed to improve performance and battery life on laptops, but running it on desktop/servers (to lower power consumption) should also be possible.
Features
- Monitoring
- Basic system information
- CPU frequency (system total & per core)
- CPU usage (system total & per core)
- CPU temperature (total average & per core)
- Battery state
- System load
- CPU frequency scaling, governor and turbo boost management based on
- Battery state
- CPU usage (total & per core)
- CPU temperature in combination with CPU utilization/load (prevent overheating)
- System load
- Automatic CPU & power optimization (temporary and persistent)
Installing auto-cpufreq
Snap store
auto-cpufreq is available on snap store, or can be installed using CLI:
sudo snap install auto-cpufreq
Please note:
-
Make sure snapd is installed and
snap versionversion is >= 2.44 forauto-cpufreqto fully work due to recent snapd changes. -
Fedora users will encounter following error. Due to
cgroups v2being in development. This problem can be resolved by either runningsudo snap run auto-cpufreqafter snap installation. Or using auto-cpufreq-installer which doesn't have this issue.
auto-cpufreq-installer
Get source code, run installer and follow on screen instructions:
git clone https://github.com/AdnanHodzic/auto-cpufreq.git
cd auto-cpufreq && sudo ./auto-cpufreq-installer
In case you encounter any problems with auto-cpufreq-installer, please submit a bug report.
AUR package (Arch/Manjaro Linux)
AUR package is available for install. After which auto-cpufreq will be available as a binary and you can refer to auto-cpufreq modes and options.
Please note: If you want to install auto-cpufreq daemon, do not run auto-cpufreq --install otherwise you'll run into an issue: #91, #96.
Instead run systemctl start auto-cpufreq to start the service. Run systemctl status auto-cpufreq to see the status of service, and systemctl enable auto-cpufreq for service to persist running accross reboots.
Configuring auto-cpufreq
You can configure profiles for battery and power supply. These profiles will let you pick which governor to use and how and when turbo boost is enabled. The possible values for turbo boost behavior are always, auto and never. The default behavior is auto, which only kicks in during high load.
Default location where config needs to be placed for it to be read automatically: /etc/auto-cpufreq.conf
Example config contents
# settings for when connected to a power source
[charger]
# see available governors by running: cat /sys/devices/system/cpu/cpu0/cpufreq/scaling_available_governors
# preferred governor.
governor = performance

# minimum cpu frequency (in kHz)
# example: for 800 MHz = 800000 kHz --> scaling_min_freq = 800000
# see conversion info: https://www.rapidtables.com/convert/frequency/mhz-to-hz.html
# to use this feature, uncomment the following line and set the value accordingly
# scaling_min_freq = 800000

# maximum cpu frequency (in kHz)
# example: for 1GHz = 1000 MHz = 1000000 kHz -> scaling_max_freq = 1000000
# see conversion info: https://www.rapidtables.com/convert/frequency/mhz-to-hz.html
# to use this feature, uncomment the following line and set the value accordingly
# scaling_max_freq = 1000000

# turbo boost setting. possible values: always, auto, never
turbo = auto

# settings for when using battery power
[battery]
# see available governors by running: cat /sys/devices/system/cpu/cpu0/cpufreq/scaling_available_governors
# preferred governor
governor = powersave

# minimum cpu frequency (in kHz)
# example: for 800 MHz = 800000 kHz --> scaling_min_freq = 800000
# see conversion info: https://www.rapidtables.com/convert/frequency/mhz-to-hz.html
# to use this feature, uncomment the following line and set the value accordingly
# scaling_min_freq = 800000

# maximum cpu frequency (in kHz)
# see conversion info: https://www.rapidtables.com/convert/frequency/mhz-to-hz.html
# example: for 1GHz = 1000 MHz = 1000000 kHz -> scaling_max_freq = 1000000
# to use this feature, uncomment the following line and set the value accordingly
# scaling_max_freq = 1000000

# turbo boost setting. possible values: always, auto, never
turbo = auto
How to run auto-cpufreq
auto-cpufreq can be run by simply running the auto-cpufreq and following on screen instructions, i.e:
sudo auto-cpufreq
auto-cpufreq modes and options
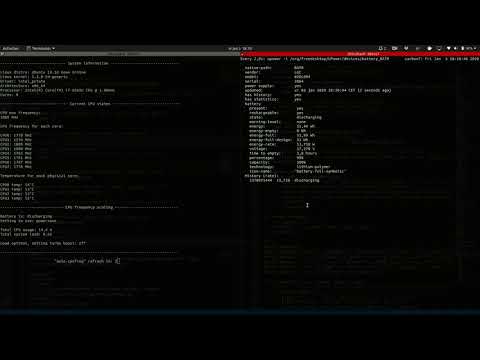
Monitor
sudo auto-cpufreq --monitor
No changes are made to the system, and is solely made for demonstration purposes what auto-cpufreq could do differently for your system.
Live
sudo auto-cpufreq --live
Necessary changes are temporarily made to the system which are lost with system reboot. This mode is made to evaluate what the system would behave with auto-cpufreq permanently running on the system.
Install - auto-cpufreq daemon
Necessary changes are made to the system for auto-cpufreq CPU optimizaton to persist across reboots. Daemon is deployed and then started as a systemd service. Changes are made automatically and live stats are generated for monitoring purposes.
sudo auto-cpufreq --install
After daemon is installed, auto-cpufreq is available as a binary and is running in the background. Its stats can be viewed by running: auto-cpufreq --stats
Since daemon is running as a systemd service, its status can be seen by running:
systemctl status auto-cpufreq
If install has been performed as part of snap package, daemon status can be verified by running:
systemctl status snap.auto-cpufreq.service.service
Remove - auto-cpufreq daemon
auto-cpufreq daemon and its systemd service, along with all its persistent changes can be removed by running:
sudo auto-cpufreq --remove
Stats
If daemon has been installed, live stats of CPU/system load monitoring and optimization can be seen by running:
auto-cpufreq --stats
Troubleshooting
Q: If after installing auto-cpufreq you're (still) experiencing:
- high CPU temperatures
- CPU is not scaling to minimum/maximum frequencies
- suboptimal CPU peformance
A: If you're using intel_pstate CPU management driver consider changing it to: acpi-cpufreq.
This can be done by editting /etc/default/grub file and appending intel_pstate=disable to GRUB_CMDLINE_LINUX_DEFAULT line, followed by sudo update-grub
Example line change:
GRUB_CMDLINE_LINUX_DEFAULT="quiet splash intel_pstate=disable"
Discussion:
Donate
Showing your support and appreciation for auto-cpufreq project can be done in two ways:
- Financial donation
- Code contribution
Financial donation
If auto-cpufreq helped you out and you find it useful, show your appreciation by donating (any amount) to the project!
PayPal

BitCoin
bc1qlncmgdjyqy8pe4gad4k2s6xtyr8f2r3ehrnl87

Code contribution
Other ways of supporting the project consists of making a code or documentation contribution. If you have an idea for a new features or want to implement some of the existing feature requests or fix some of the bugs & issues. Please make your changes and submit a pull request which I'll be glad to review. If your changes are accepted you'll be credited as part of releases page.
Please note: auto-cpufreq is looking for co-maintainers & open source developers to help shape future of the project!