88 lines
5.6 KiB
Markdown
88 lines
5.6 KiB
Markdown
# Customizing Mangane
|
|
|
|
Mangane uses your own site's name and branding throughout the interface.
|
|
This allows every Mangane site to be different, and catered to a particular audience.
|
|
Unlike Mastodon, which uses the "Mastodon" branding on all instances, Mangane does not refer to itself in the user interface.
|
|
|
|
## Backend settings
|
|
|
|
The site's name and description are **configured in the backend itself.**
|
|
These are settings global to your website, and will also affect mobile apps and other frontends accessing your website.
|
|
|
|
- On Mastodon, you can change it through the admin interface.
|
|
- On Pleroma, it can be edited through AdminFE, or by editing `config/prod.secret.exs` on the server.
|
|
|
|
These settings are exposed through the API under GET `/api/v1/instance`.
|
|
|
|
## Mangane settings
|
|
|
|
Most settings are specific to your Mangane installation and not the entire website.
|
|
That includes the logo, default theme, and more.
|
|
|
|
- On Pleroma, admins can edit these settings directly from Mangane. Just click "Mangane config" in the sidebar, or navigate directly to `/soapbox/config`.
|
|
- On Mastodon, admins need to upload a JSON file with the settings, and make it available at `https://yoursite.tld/instance/mangane.json`.
|
|
|
|
If using Pleroma, these settings are exposed through the API under GET `/api/pleroma/frontend_configurations`.
|
|
Otherwise, the settings need to be uploaded manually and made available at GET `/instance/mangane.json`.
|
|
|
|
### The instance logo in the web-UI (from mangane-config)
|
|
The instance logo must be a valid svg file. It will be shown in pages using the same icon system than the rest of the app, in order to match the colors settings. Be sure to use a 'raw' svg file, and to not simply use a svg wrapper for a bitmap image.
|
|
|
|
If you want the logo to match your color settings, you will need to update it so every `fill` or `stroke` property that you want to change use the special value `currentColor`
|
|
https://css-tricks.com/currentcolor/
|
|
|
|
## Static files
|
|
|
|
### PWA logo
|
|
|
|
Mangane can be installed as a Progressive Web App (PWA) on both iPhones and Android devices.
|
|
Once installed, it will appear as a regular application. You have the option to customize the icon displayed by the operating system:
|
|
|
|
1 - Find your static directory. For Akkoma, it will be located at `/var/lib/akkoma/static`.
|
|
2 - If it doesn't exist, create a new `static` folder once in the static directory.
|
|
3 - Place your logo in two formats here:
|
|
- Save the logo as an svg file named `logo.svg`.
|
|
- Save the logo as a 512x512 png file named `logo-512.png`.
|
|
|
|
### About pages
|
|
|
|
It is possible to create arbitrary HTML pages under `/about/:page` on your website.
|
|
|
|
In your Mangane installation directory (probably on your server), find the `instance` folder.
|
|
For Pleroma, this will be located under `/opt/pleroma/instance/static/instance`.
|
|
This directory contains files that are loaded on-demand by the browser, including about pages.
|
|
|
|
Just create a file like `instance/about/hello.html` on your server and it will become available under `/about/hello` on your instance.
|
|
If you create a file called `index.html`, it will be treated as the root (available under `/about`), and you can create subfolders too.
|
|
|
|
For convenience, Mangane ships with sample files under `instance/about.example`.
|
|
Simply rename that directory to `about` and start editing!
|
|
|
|
## How to add new emojis to a reaction on a status?
|
|
|
|
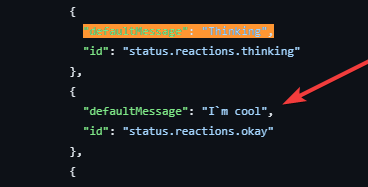
1. We clone the Mangane repository to our computer/server and then open the file **app/soapbox/locales/defaultMessages.json**
|
|
In it, we look for the field `"defaultMessage": "Love","`.
|
|
After it, we indent to write code for our emoji (to make the translation work).
|
|
|
|
In my case, I translated the emoji "Okay" and named its ID as "status.reactions.okay".
|
|
|
|
2. Now we go to **app/soapbox/components/status-action-bar.tsx** and search for `_reactionHeart: { id: 'status.reactions.heart', defaultMessage: 'Love' },` After that, we simply duplicate its code, replacing "heart" and "love" with the name and description of our emoji. For example, we replace `status.reactions.heart" with "status.reactions.okay` and replace `defaultMessage: 'Love'` with `defaultMessage: 'I'm okay'` (default language is English).
|
|

|
|
|
|
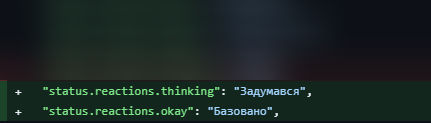
3. After this step, we go to the file with our localization and add new translation lines. In my case, it's Ukrainian localization, so the file **app/soapbox/locales/uk.json**
|
|
|
|
|
|
|
|
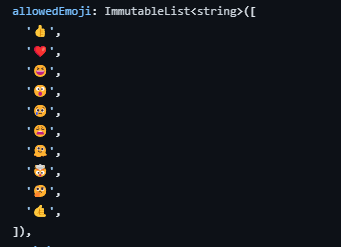
4. "Now that we have finished with the localization, we go to the configuration file of Mangane(Soapbox), which is located at app/soapbox/normalizers/soapbox/soapbox_config.ts, and look for `❤️,` in it.
|
|
We can add our newly created emoji in a similar manner. For example, we can add our "Okay" emoji by adding the following line to the config file: `'👌',`
|
|
This will add the "Okay" emoji to the list of available reactions in the app."
|
|
|
|
|
|
5. In this file, we are almost done. Now, we go to the last file, which is **app/soapbox/utils/emoji_reacts.ts**. We can add our newly created emoji in the same way as we did in soapbox_config.ts and we are done.
|
|

|
|
|
|
Now, we need to build Mangane and install it on our instance. After installation, the new reactions will appear when we click the 'Refresh' button on the website.
|
|
|
|
If you want to see how I did it in my repository, you can check it out at the following [link.](https://github.com/ua-thinking/ak.noleron.com/commit/2d20b259f95b0a895d376a43890d523c189d0781)
|
|
|